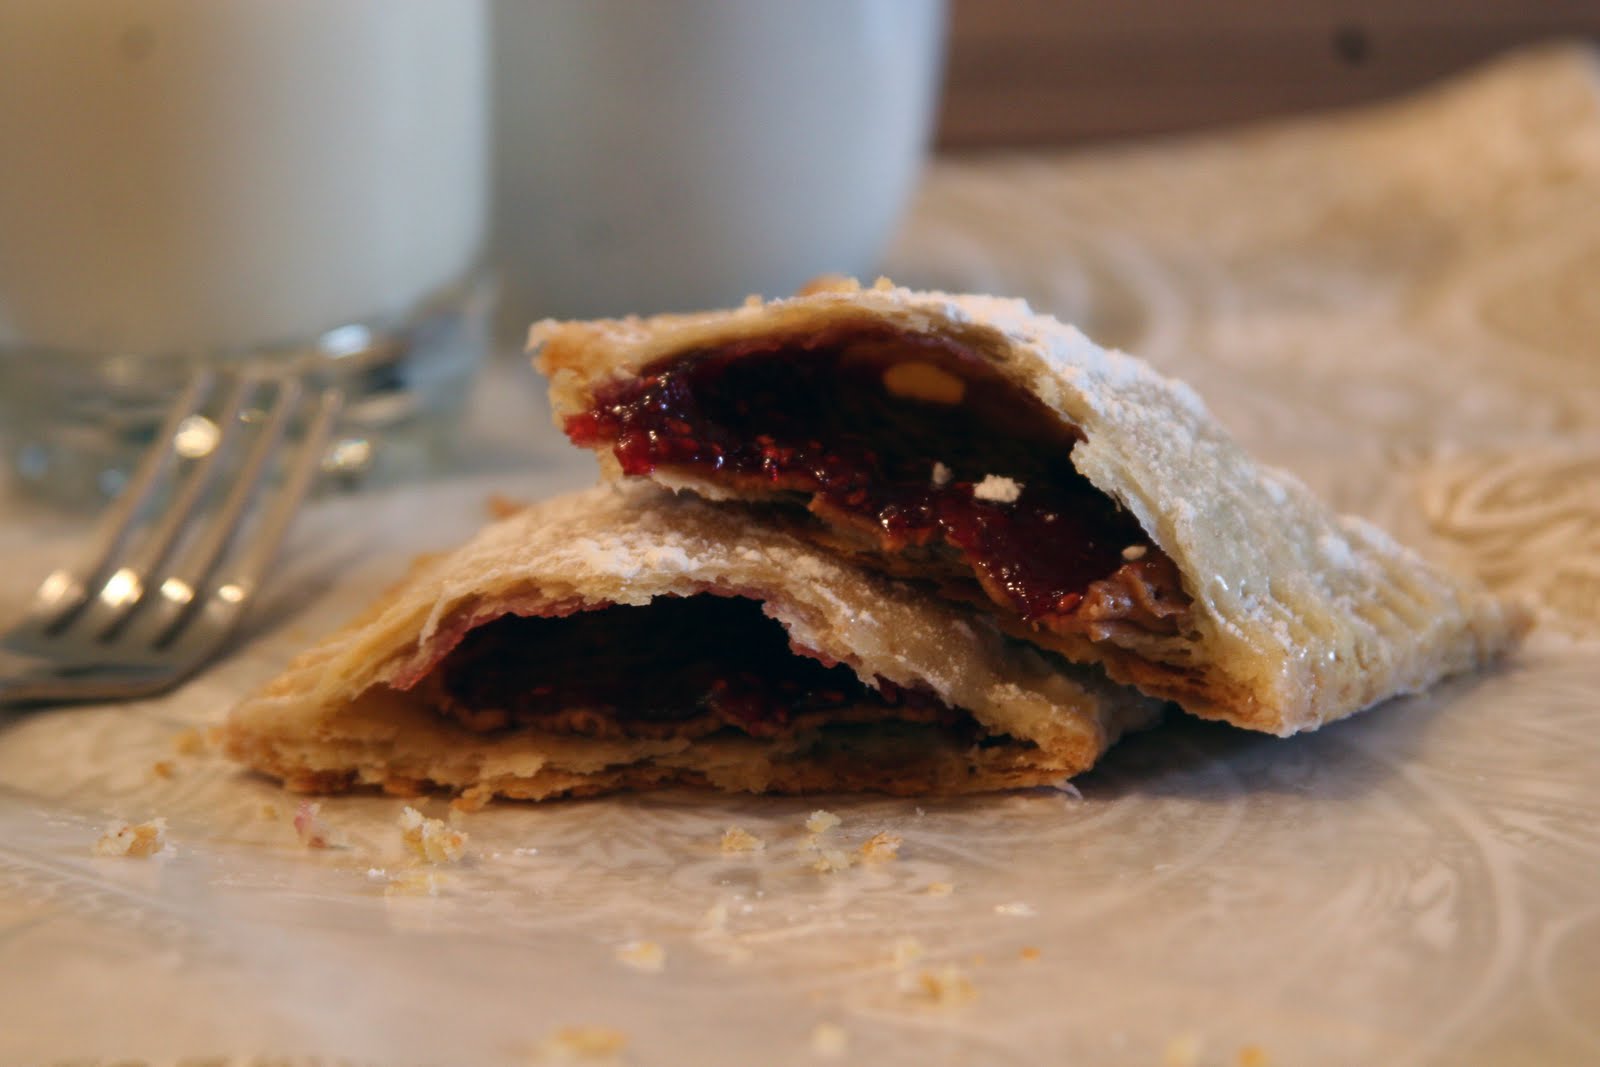
 I really, truly want to think of something beautiful and eloquent to write about these homemade pop tarts because boy are they deserving of everything good I could write. But the only thing that I can think of, having just finished eating one, is OH MY GOSH. This, my friends, is what a toaster pastry was intended to taste like before it turned into the processed, flavorless, under-filled brick you have come to know as a pop tart.
 I have stumbled across a couple different recipes for homemade toaster pastry over the past couple weeks and immediately thought it was a fun and innovative take on breakfast. And when the flawless Deb of The Smitten Kitchen posted a similar recipe on her site I knew I wouldn’t be able to resist. So if you were to have stopped by my apartment around 11:30 last night, you would have found me, covered in flour, fully immersed in pastry dough making.
In the past I’ve been frustrated with pastry dough. It has always made me feel inadequate and insecure about my baking ability because I didn’t feel it was flaky, buttery, or delicious enough. My mom, who growing up served as one of my best, and toughest, critics held the bar pretty darn high when it came to an acceptable pastry crust, always comparing it to her mother’s pie crust. If you met my grandmother and had a piece of one of her pies, you would know how high of a bar we are talking. So it’s really no surprise I felt bad about my own pastry skills. Until now.
Throughout this whole pastry making process, I was convinced it wasn’t actually worth the effort but boy was I wrong. These things are seriously amazing – this coming from a girl who doesn’t even like pop tarts and hasn’t eaten one in over 10 years. They are yummy, and charming in the familiar-yet-different way. I can already imagine making them on weekends when I want to make breakfast a little (or a lot) more special.
 Homemade Pop Tarts
Adapted from Deb via The Smitten Kitchen
Ingredients:
Pastry
*2 cups (8 1/2 ounces) all-purpose flour
*1 tablespoon sugar
*1 teaspoon salt
*1 cup (2 sticks or 8 ounces) unsalted butter, cut into pats
*1 large egg
*3 tablespoons milk
*1 additional large egg (to brush on pastry)
*1 recipe Jam Filling (below)
*1/2 cup creamy peanut butter (not the natural variety)
*1 cup powdered sugar and 1/4 cup milk stirred together for glaze
Jam Filling
1/2 cup raspberry preserves stirred together with 1 1/2 tsp. cornstarch
Instructions:
Make the dough
Whisk together the flour, sugar, and salt. Work in the butter with your fingers, pastry blender or food processor until pea-sized lumps of butter are still visible, and the mixture holds together when you squeeze it. If you’ve used a food processor, transfer the mixture to a large bowl. Whisk the first egg and milk together and stir them into the dough, mixing just until everything is cohesive, kneading briefly on a well-floured counter if necessary.
Divide the dough in half and shape each half into a smooth rectangle, about 3×5 inches. You can roll this out immediately or wrap each half in plastic and refrigerate for up to 2 days. (I refrigerated overnight and found that the dough was still a bit crumbly so I put the dough back into the food processor after refrigerating and pulsed it 6-8 times, then formed it into a rectangle and rolled it out. Worked like a dream and the pastry was still oh so flaky!)
Assemble the tarts: If the dough has been chilled, remove it from the refrigerator and allow it to soften and become workable, about 15 to 30 minutes. Place one piece on a lightly floured work surface, and roll it into a rectangle about 1/8″ thick, large enough that you can trim it to an even 9″ x 12″. [You can use a 9″ x 13″ pan, laid on top, as guidance.] Repeat with the second piece of dough. Set trimmings aside. Cut each piece of dough into thirds – you’ll form nine 3″ x 4″ rectangles.
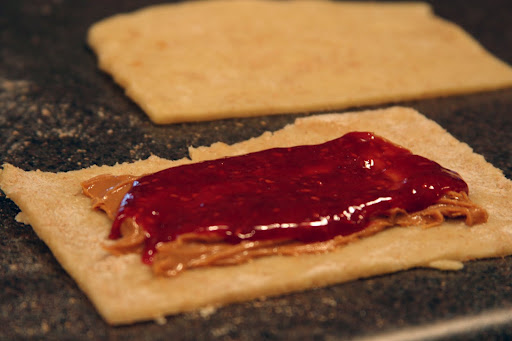
Beat the additional egg and brush it over the entire surface of the first dough. Place a heaping tablespoon of peanut butter into the center of each rectangle followed by a teaspoon of the jam mixture, keeping a bare 1/2-inch perimeter around it. Place a second rectangle of dough atop the first, using your fingertips to press firmly around the pocket of filling, sealing the dough well on all sides. Press the tines of a fork all around the edge of the rectangle. Repeat with remaining tarts.
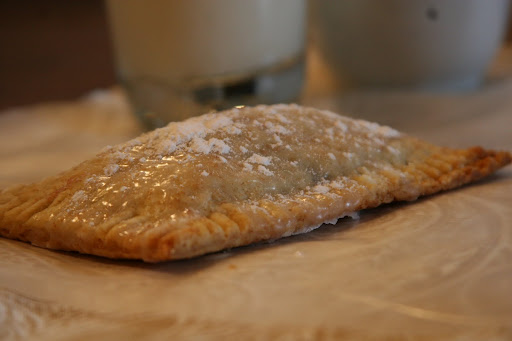
Gently place the tarts on a lightly greased or parchment-lined baking sheet. Prick the top of each tart multiple times with a fork; you want to make sure steam can escape. Refrigerate the tarts (they don’t need to be covered) for 30 minutes, while you preheat your oven to 350°F. Bake them for 20 to 25 minutes, until they’re a light golden brown. Spoon a tablespoon of powdered sugar glaze on top of hot pastries. Cool in pan on rack.
Happy Baking!
Madison